

TikTok — Source with TikTok Ads
This article explains how to set up a TikTok Source in Tracker: how to connect your Pixel ID and Access Token, map events, build your campaign in TikTok Ads, and verify event delivery. When is a TikTo
This article explains how to set up a TikTok Source in Tracker: how to connect your Pixel ID and Access Token, map events, build your campaign in TikTok Ads, and verify event delivery.
When is a TikTok Source needed?
Use this Source if your traffic comes from TikTok Ads and you need to send events from Tracker back to your TikTok Pixel. This helps TikTok learn from actual conversions such as sign-ups, contacts, subscriptions, sales, and repeat sales.
How it works
TikTok receives events via Events API. Each Tracker event corresponds to a TikTok event.
For example:
registration → CompleteRegistration
sale → CompletePayment
contact → Contact
When a user performs an action within the funnel, Tracker sends the corresponding event to your TikTok Pixel. This allows the TikTok algorithm to learn from real conversions and find similar audiences.
Setup steps
Create a TikTok Pixel
Open TikTok Ads Manager → Events Manager, create a new Pixel, and copy its Pixel ID. This identifier indicates which TikTok Pixel the events will be sent to.Get the Pixel Access Token
In the settings of the created Pixel, generate a Pixel Access Token for the Events API. Save the token: it is required to connect the Source in Tracker.Create a Source in Tracker
Open the desired campaign in Chatterfy, go to the Sources tab, and click Add source. In the Provider field, select TikTok.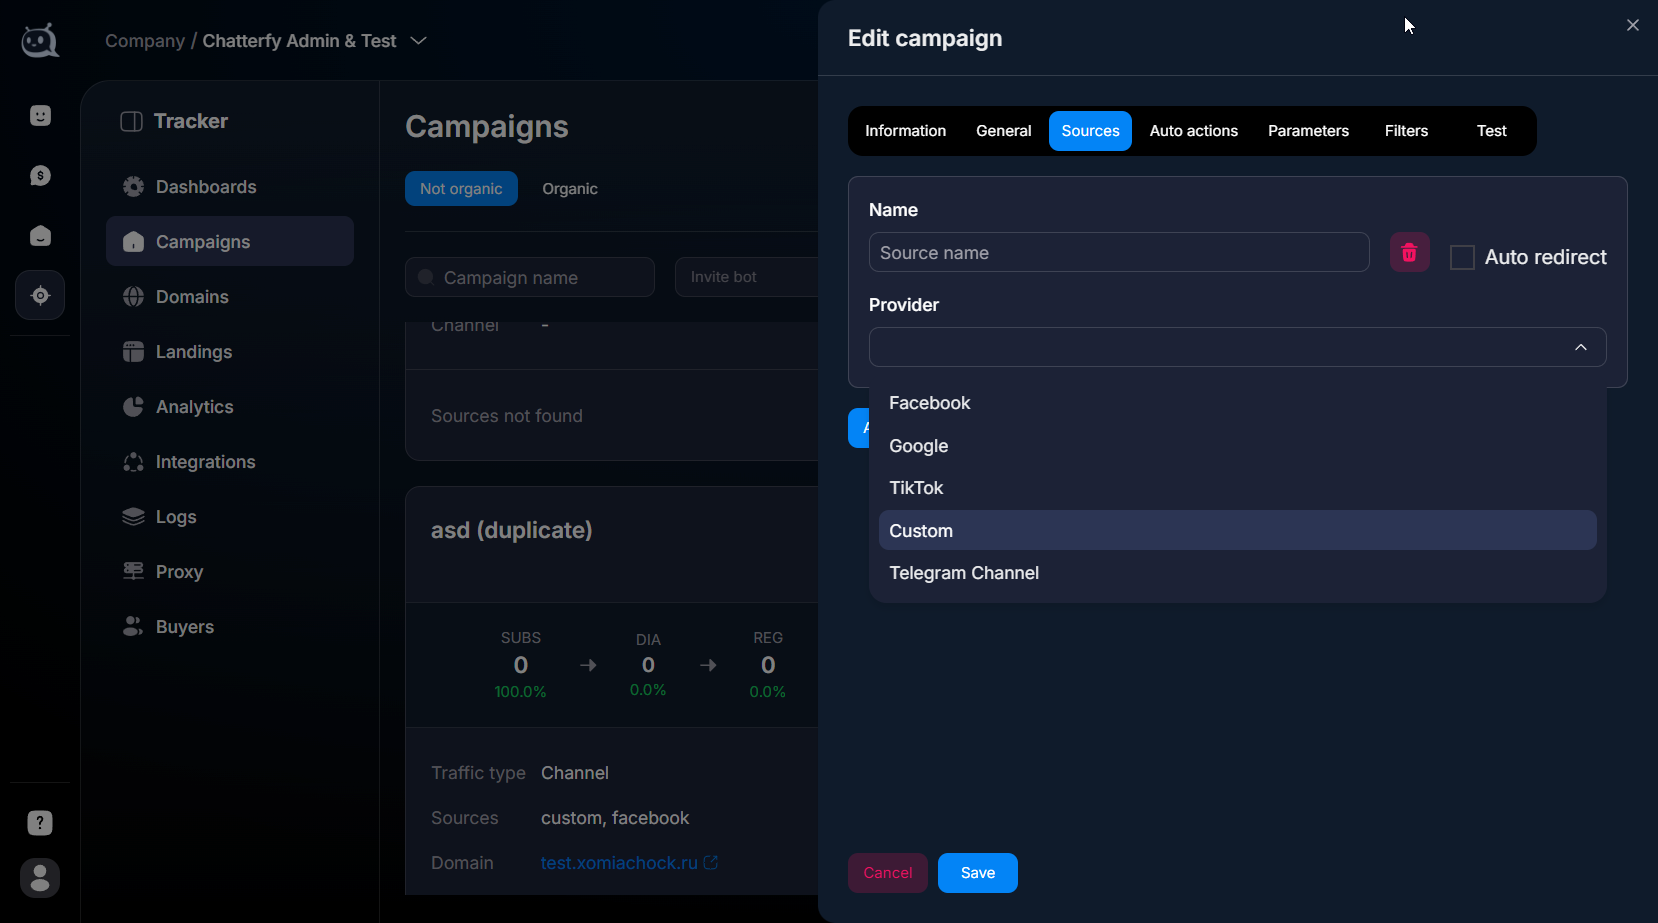
Step 3. Creating a Source in Tracker: selecting Provider = TikTok Enter Pixel ID and Pixel Access Token
Enter your Pixel ID and Pixel Access Token in the respective Source fields. Both values must belong to the same Pixel.Configure Mapping events
Map your Tracker events to TikTok events. Verify that the selected events match your goal in TikTok Ads: lead, registration, subscription, or purchase.Configure Parameters
In the Parameters section, select the parameter preset for TikTok and check if you have all the necessary events. If anything is missing, add the event manually.Save the Source and verify event delivery
Click Save. Then open the Test section inside the campaign, perform a test run using the Test button, and check the event in Logs → Sources logs.
Setting up a campaign in TikTok Ads
How to read this section
The first three screens show how to select a campaign objective. These are alternatives: choose one scenario based on your task, then proceed to configure the ad content, creatives, targeting, and budget.
Choose "Lead Generation → Instant Form TikTok" if you are collecting leads inside TikTok
This option is suitable when the user submits their contact information directly in the TikTok form. Select "Lead Generation," then "Instant Form TikTok," and click "Continue."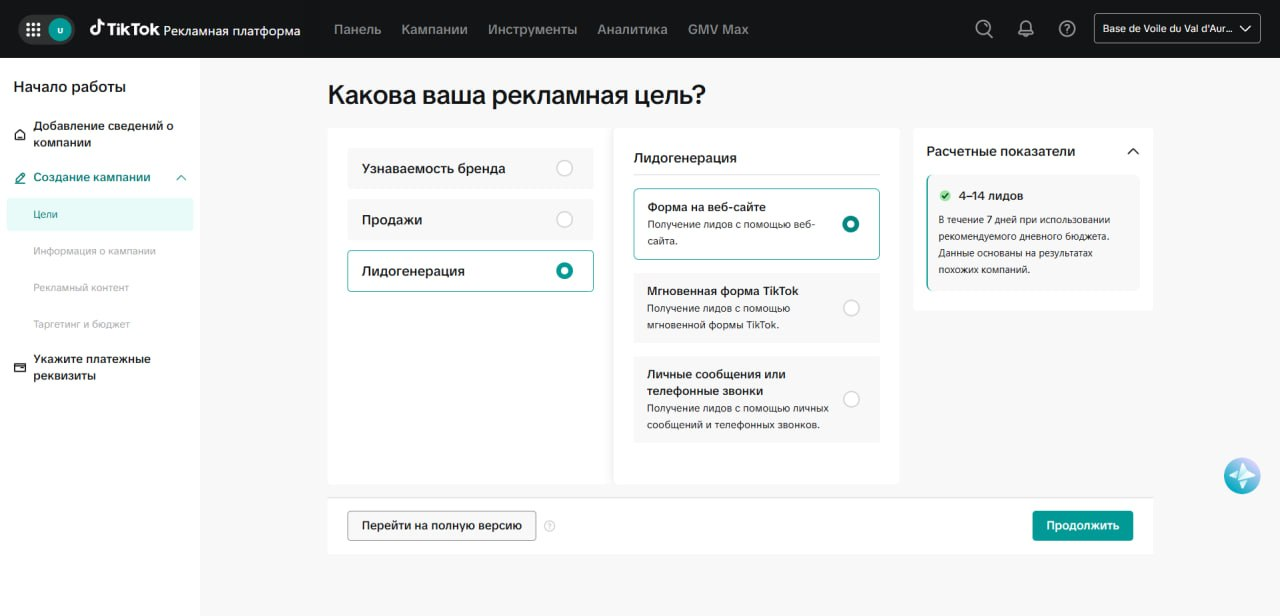
Campaign objective: Lead Generation → Form on website Choose "Sales → Website Conversions" for payments and deposits
If the campaign needs to be optimized for a purchase, deposit, or another valuable action on the site, choose "Sales" and the "Website Conversions" option. In Tracker, this scenario is usually linked to sale and resale events.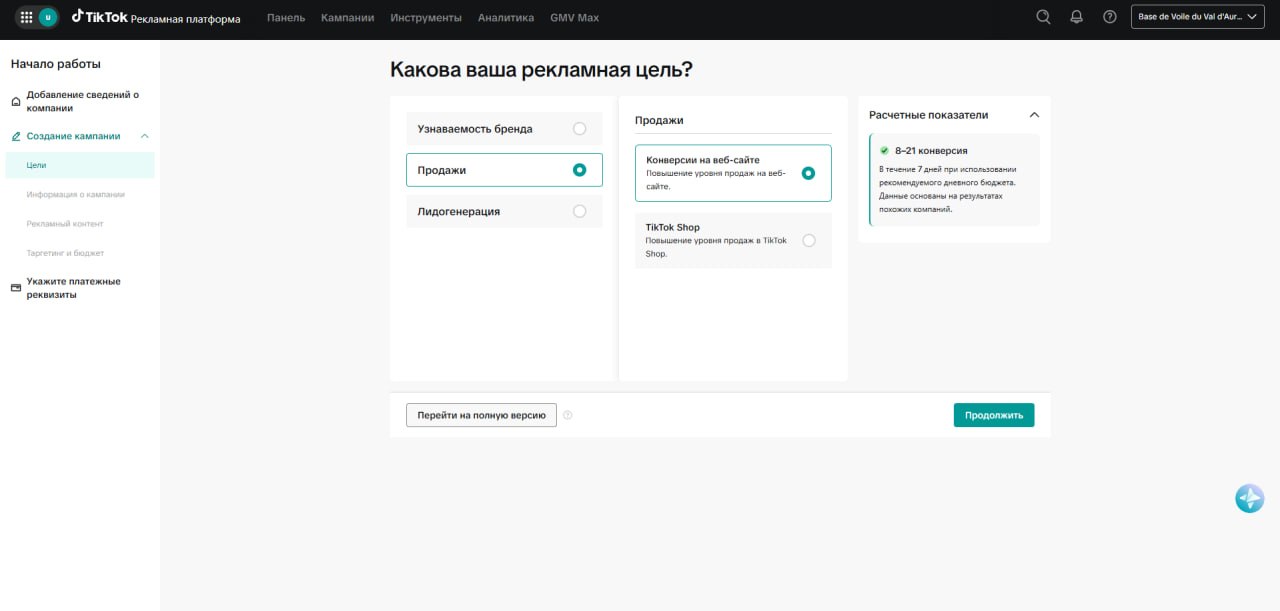
Step 2. Campaign objective: Sales → Website Conversions Choose "Brand Awareness → Traffic" for link clicks
If your main goal is to drive users to a landing page, Telegram channel, Telegram bot, or another external route, select "Brand Awareness" and the "Traffic" objective. This is the base scenario for traffic driven via Tracking link.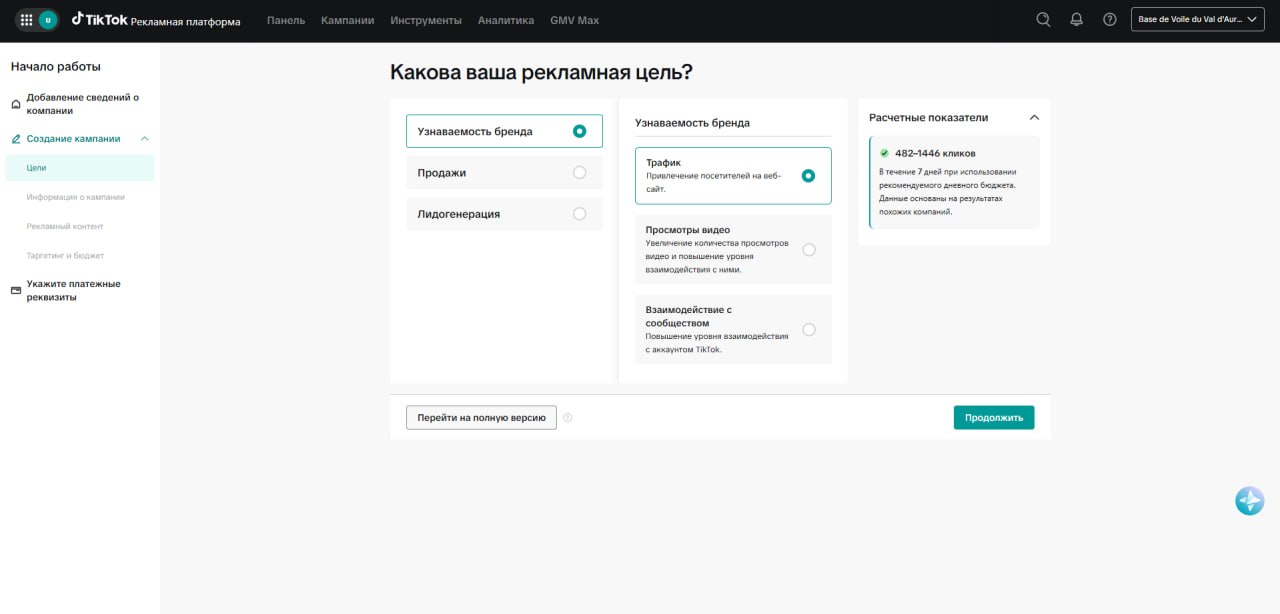
Step 3. Campaign objective: Brand Awareness → Traffic Fill in the campaign information
On the "Campaign Information" screen, set the campaign name and check the optimization goal. In this example, the "Landing Page View" goal is selected. Permissions for comments, downloads, and reposts can be left enabled unless this contradicts your mechanics.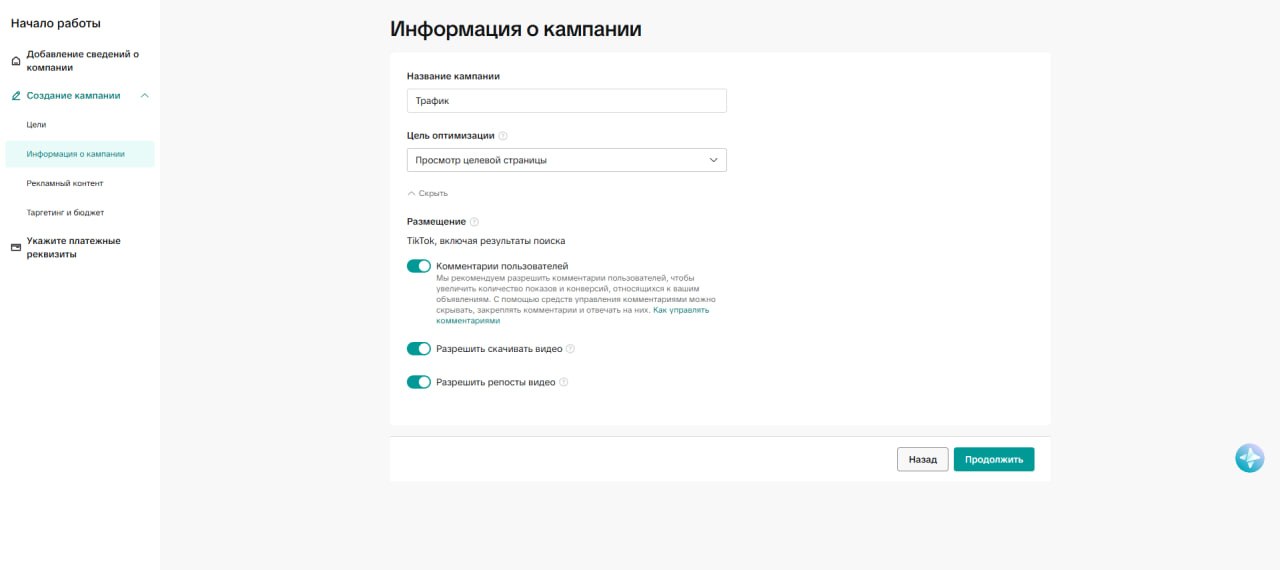
Step 4. Campaign information and basic permissions Check the optimization goal
Open the optimization goal drop-down list. For landing page visits, "Landing Page View" is usually selected; for simpler traffic, "Click" is chosen. The selection should match the action you actually want to train the ads for.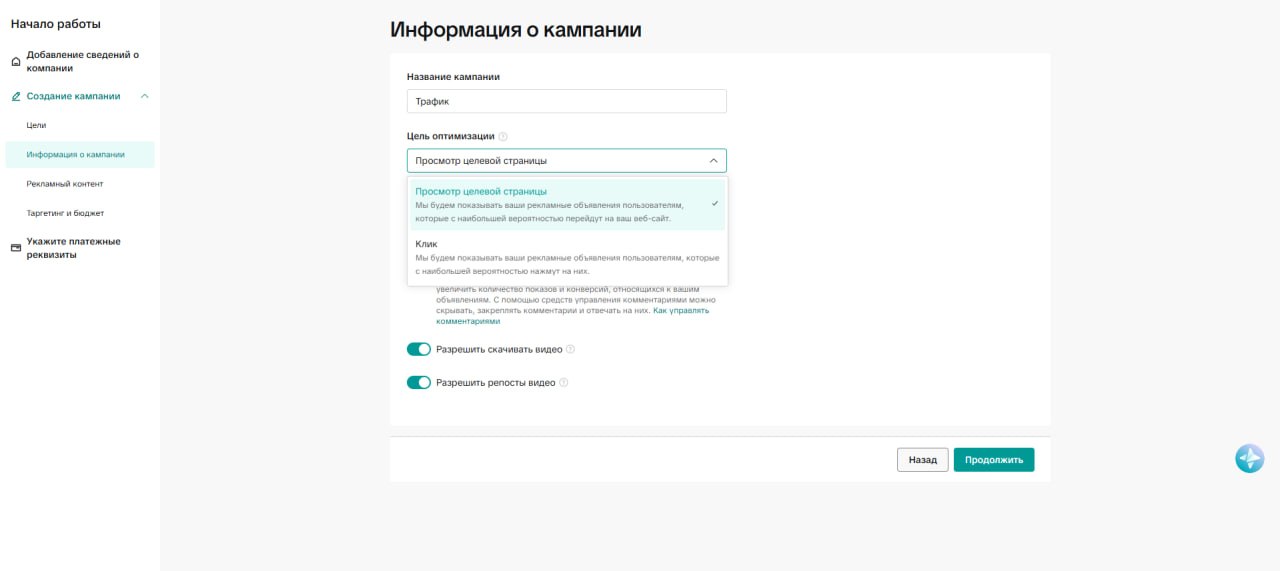
Step 5. Selecting the optimization goal: landing page view or click Proceed to ad content
In the "Ad Content" step, connect your TikTok account or add an approved post. The continue button may not be available until an account or post is selected.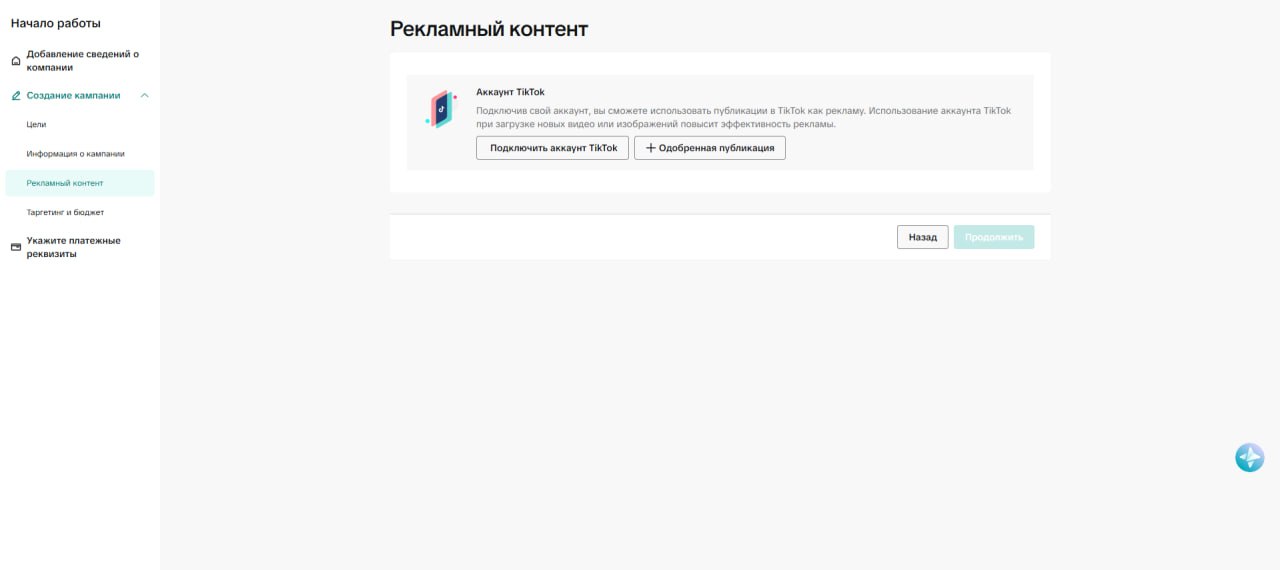
Step 6. Ad content: TikTok account or Spark Ad Find a post by ID if using a Spark Ad
If the creative is taken from an existing post, open the "Post ID" window, paste the TikTok post ID, and click "Search".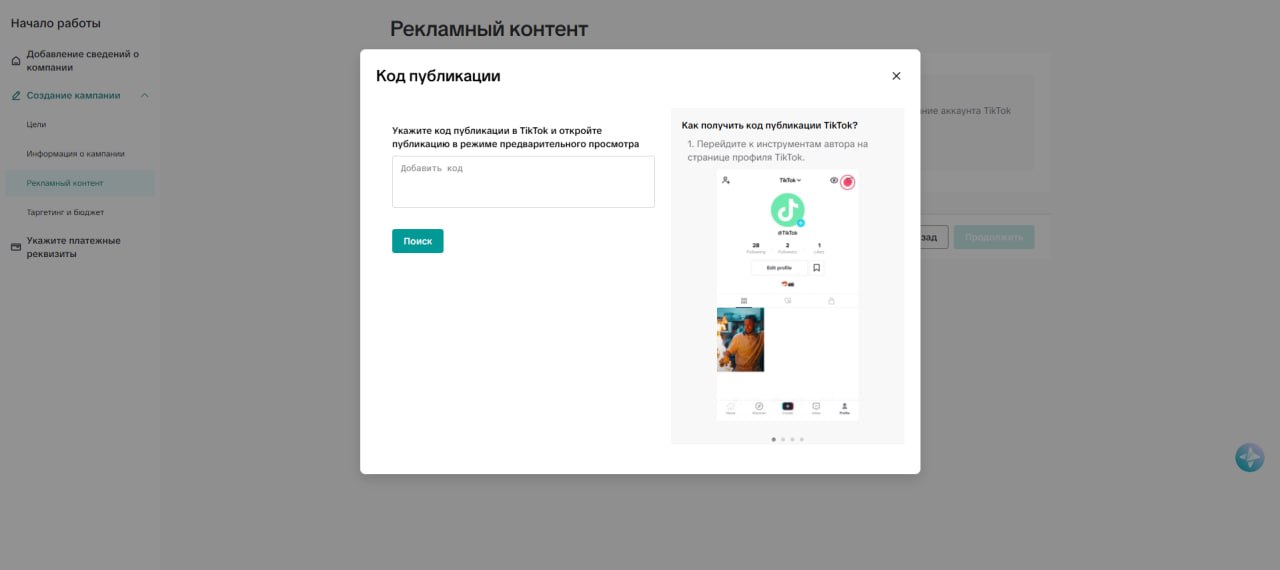
Step 7. Searching for a post by ID in TikTok Ads Specify a destination URL
In the "Destination URL" field, paste the link that the ad will lead to. To connect with Tracker, use the Tracking link with the necessary parameters so that events and clicks are correctly recorded in your analytics.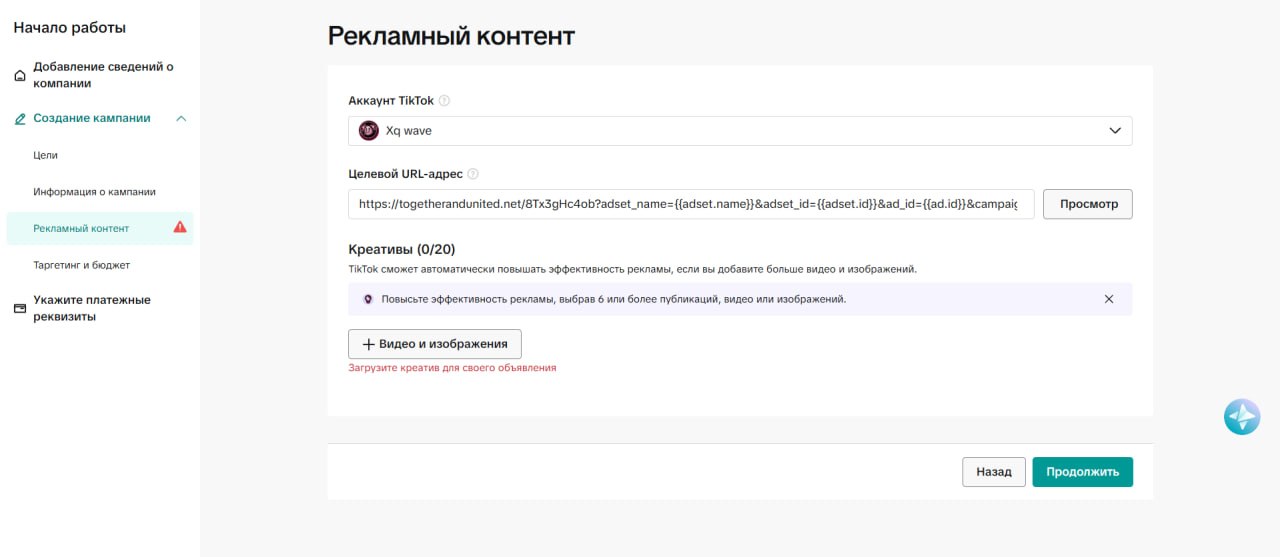
Step 8. Ad content: destination URL and creative block Open the creative addition window
Click "Video and Images". If there is nothing in the library yet, an empty creative addition window will appear. Next, you need to upload or select a suitable material.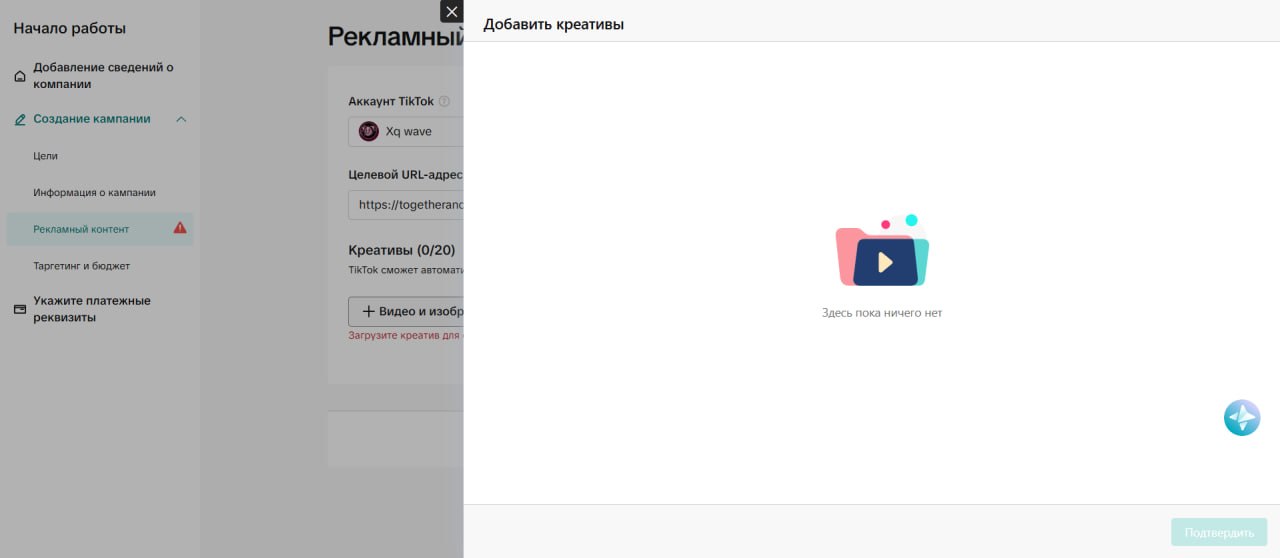
Step 9. Creative addition window 10. Upload and crop the creative
When uploading an image or video, check the format and cropping area. The example uses a landscape format; if necessary, enable Gaussian blur for the empty area and confirm the result.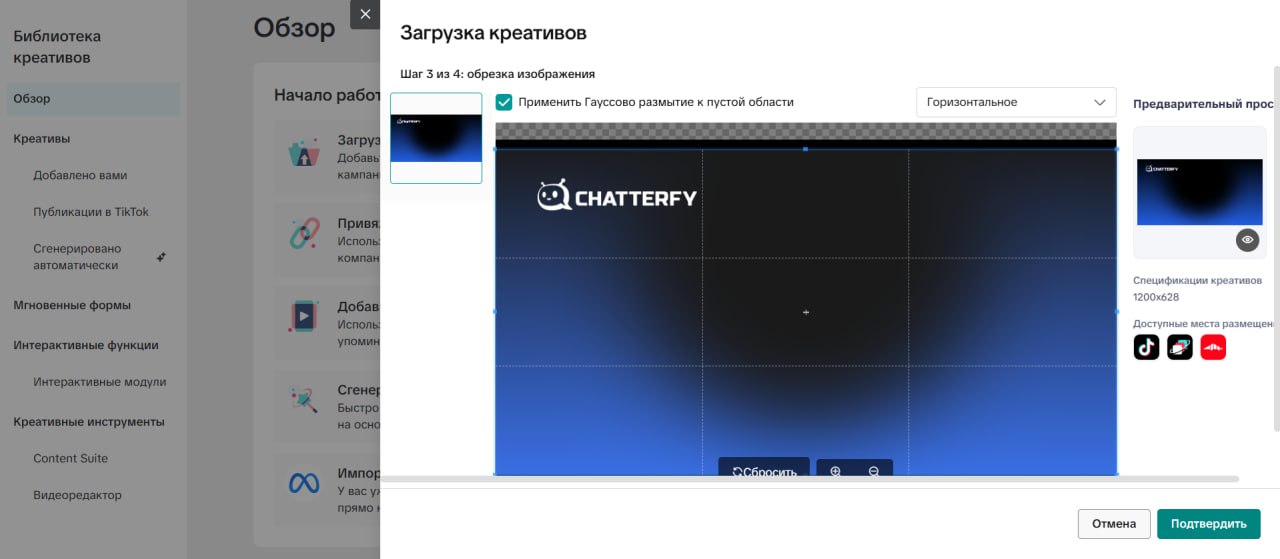
Step 10. Uploading and cropping a creative 11. If the creative is already uploaded, open the creative library
Use the top menu "Tools" to go to "Creative Library". This is convenient if the material was added previously and you just need to select it for the ad.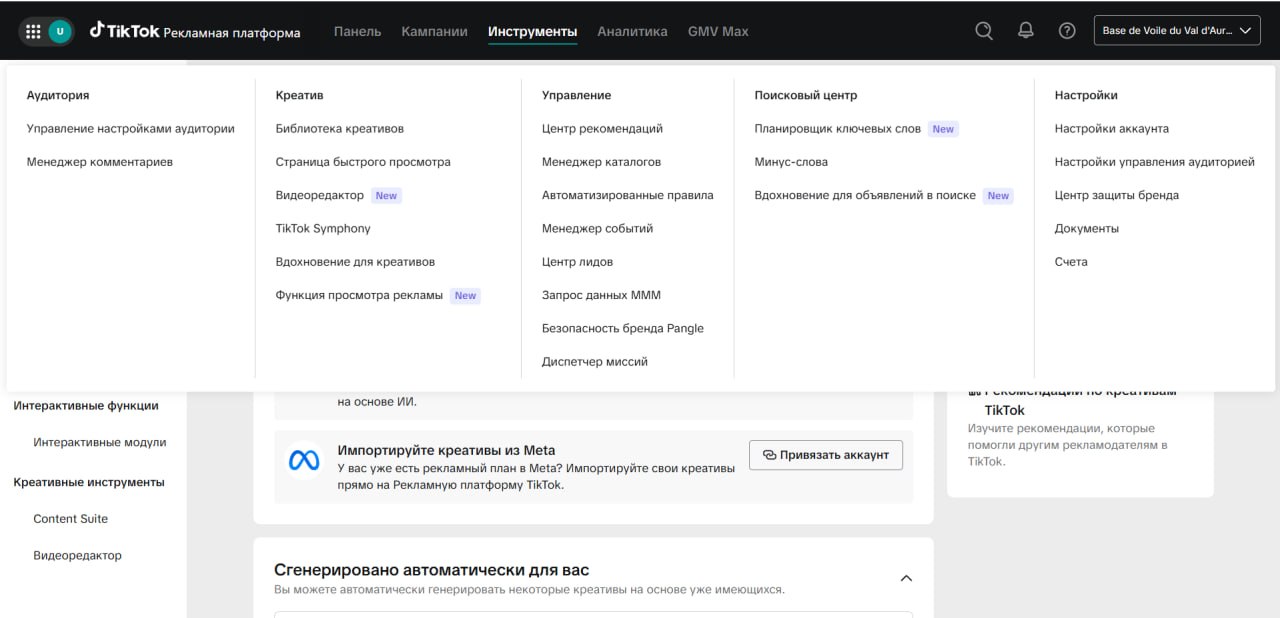
Step 11. Navigating to the creative library via the Tools menu 12. Select a creative from the library
In the "Add Creatives" window, find the required file by name or filters, select it, and confirm the choice. Once selected, the creative will appear in the ad.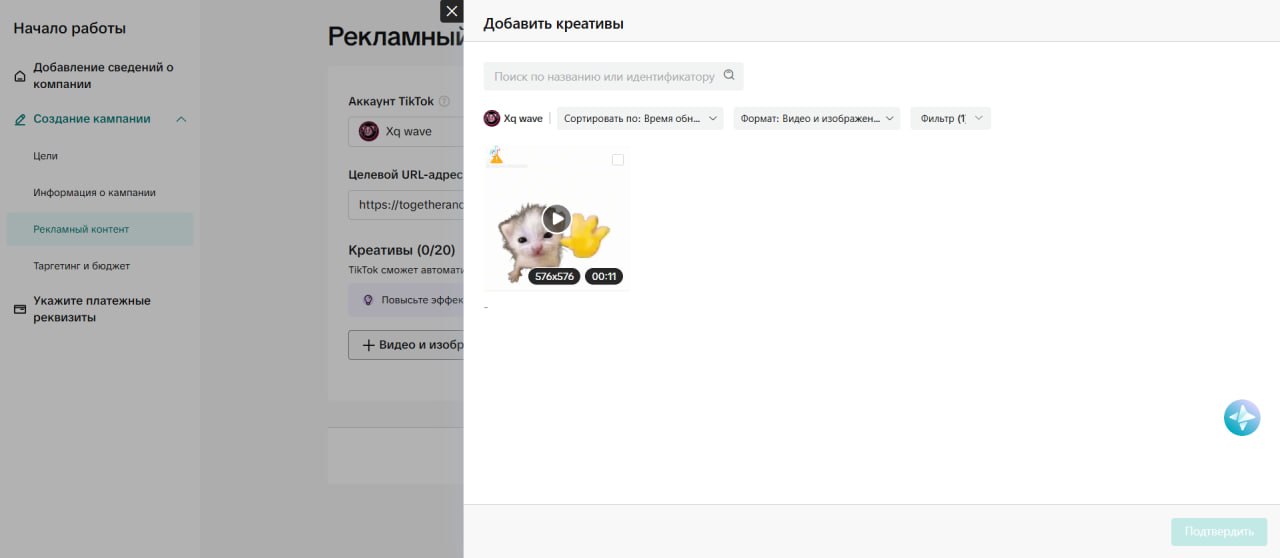
Step 12. Selecting a creative from the library 13. Check the ad preview and CTA
After adding the creative, check the preview on the right: how the video or image looks, which CTA is selected, and whether the link is broken. In the example, a set of CTA options is selected, including "Try Now", "Apply Now", and "Sign Up".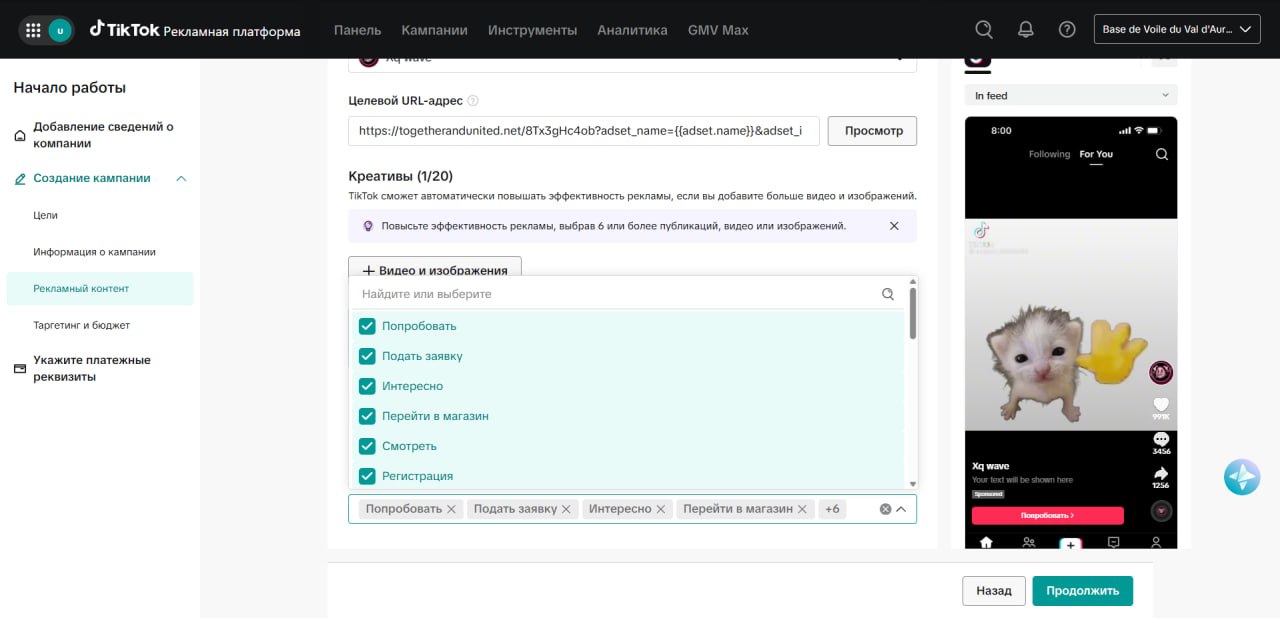
Step 13. Ad preview and CTA selection 14. Proceed to targeting and budget
In the "Targeting & Budget" step, select the targeting mode. The automatic option is suitable for a quick launch, while the custom one is for when you need to manually control the audience.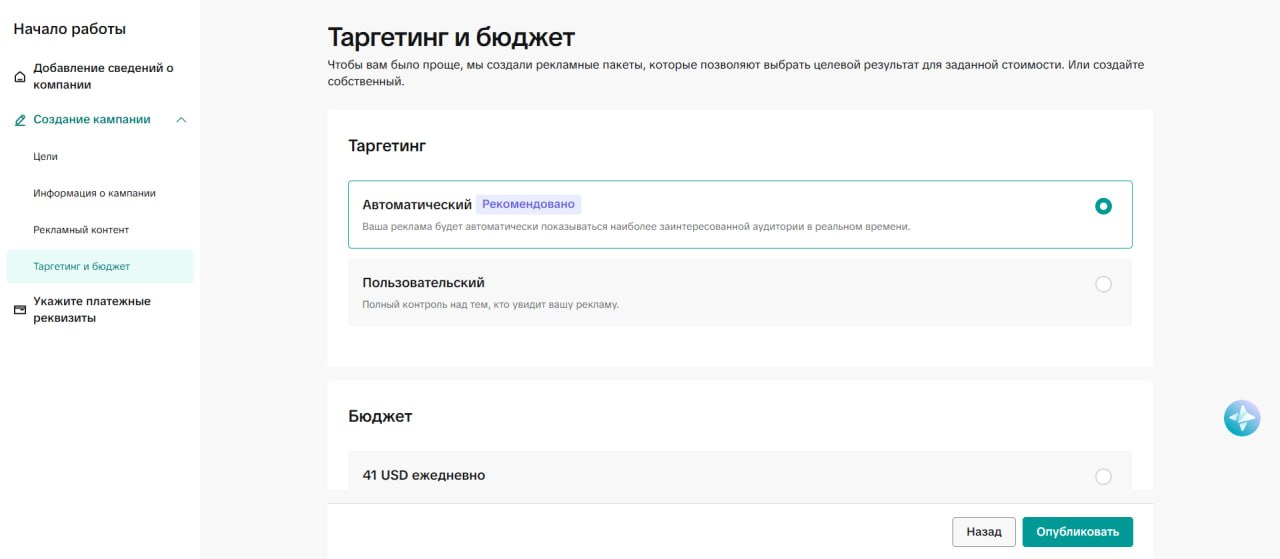
Step 14. Targeting and budget: selecting the targeting mode 15. Configure custom targeting if manual control is needed
If you choose "Custom", check the location, languages, and gender. In the example, France is specified, and other parameters are left without restrictions.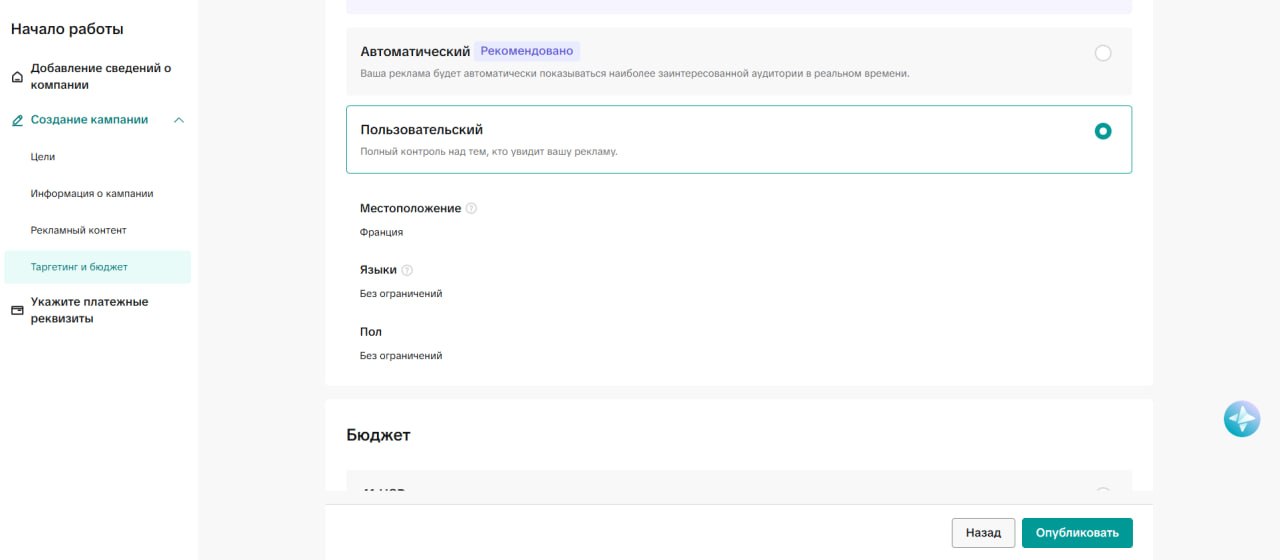
Step 15. Custom targeting: geo, language, and gender 16. Select the budget
In the "Budget" block, you can select a recommended package or a custom budget. In the example, a custom daily budget of 20 USD is selected.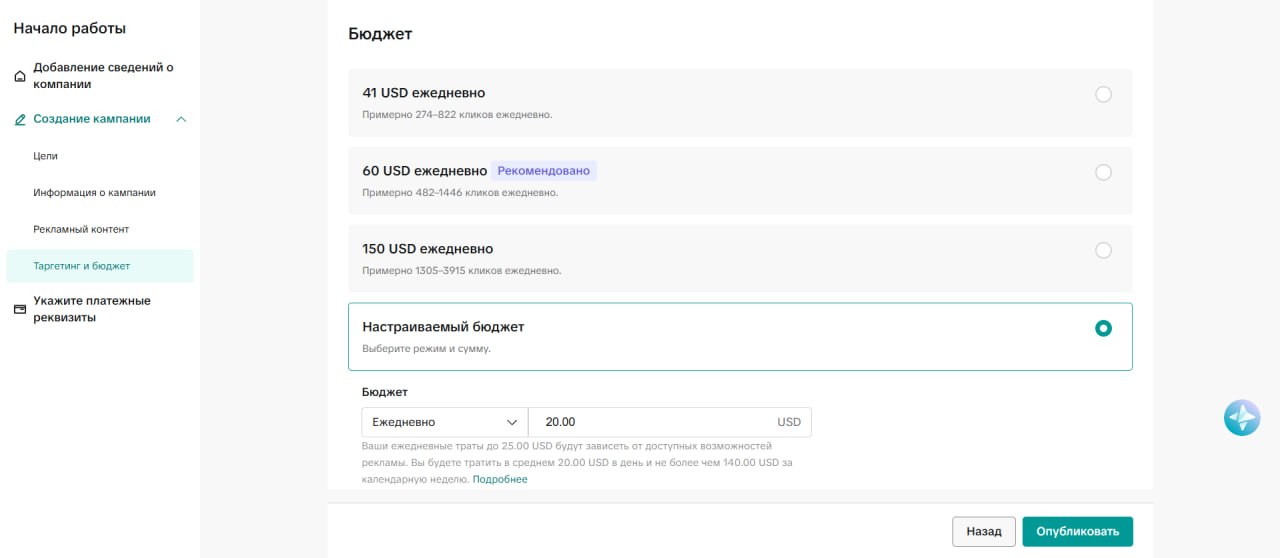
Step 16. Custom daily budget 17. Check the schedule and publish the campaign
In the schedule, TikTok recommends running ads for at least 7 days for the algorithm to complete learning. After checking the budget, schedule, and terms, click "Publish".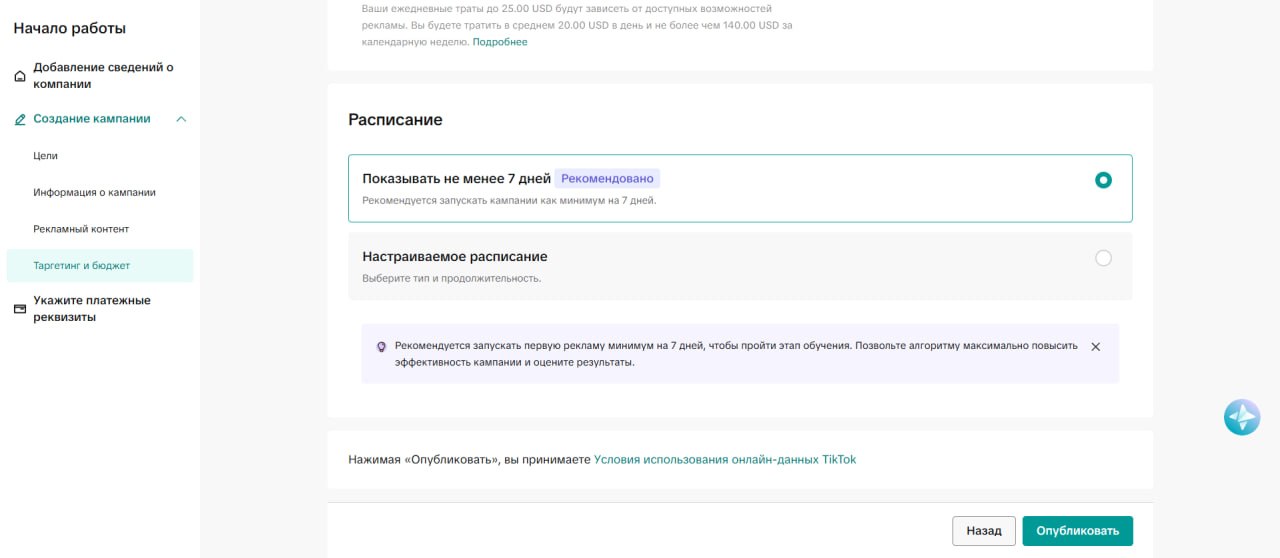
Step 17. Campaign schedule and publishing
Do not mix goals and events
The campaign goal in TikTok Ads must match the events you are passing from Tracker. If you select a traffic goal in TikTok, but only pass sales from Tracker, the algorithm may lack enough signals for proper learning.
Good practice before publishing
Before launching, check the Tracking link via preview, ensure the creative is selected, the CTA looks correct, the budget is not accidental, and events appear in Sources logs and TikTok Events Manager after a test click.
Source fields
Field | Description | Example |
|---|---|---|
Name | Internal name of the source. | TikTok-US-Crypto |
Provider | Source type. Select TikTok. | TikTok |
Pixel ID | TikTok Pixel identifier. | 739812345678901234 |
Pixel Access Token | Token for sending events via Events API. | ttp_xxxxxxxxx |
Proxy | Proxy for sending requests. Used optionally. | proxy.example.com |
Mapping events | Mapping between Tracker and TikTok events. | sale → CompletePayment |
Event Mapping
Tracker allows you to transmit the following events to TikTok:
Tracker Event | TikTok Event |
|---|---|
page view | ViewContent |
click | ClickButton |
registration | CompleteRegistration |
subscribe channel | Subscribe |
unsubscribe channel | Search |
sale | CompletePayment |
resale | CompletePayment |
user start bot | SubmitForm |
contact | Contact |
contact invite bot | AddToWishlist |
Additional parameters for sales
For sale and resale events, conversion value parameters are transmitted automatically.
Параметр | Значение |
|---|---|
value | {cost} |
currency | {currency} |
This allows TikTok to receive the actual conversion value and use it to optimize advertising campaigns.
Use Cases
TikTok Ads to a Telegram channel
An affiliate marketer runs TikTok ads to a Telegram channel. The main goal is subscriptions. In Tracker, a subscribe channel → Subscribe event is configured. Each new subscription is sent to TikTok and used to optimize the campaign.
TikTok Ads to a Telegram bot
Traffic is driven to a Telegram bot for lead generation. In Source, events are configured: user start bot → SubmitForm and contact → Contact. When a user starts the bot or sends the first message, TikTok receives a conversion and trains the advertising campaign.
Optimization for deposits
Traffic is sent to an offer with a deposit. In the settings, sale → CompletePayment is specified. Also, value = {cost} and currency = {currency} are transmitted. TikTok receives data on the conversion value and can optimize for buyers, not just for registrations.
Что важно учесть
The Pixel ID and Pixel Access Token must belong to the same Pixel. If there is an error in the Access Token, events will not be sent to TikTok. To transmit the conversion value, use the value and currency parameters. After configuration, it is recommended to perform a test conversion and verify that events are being received in the TikTok Events Manager. If you use multiple ad accounts or Pixels, create a separate Source for each Pixel.
Хорошая практика
For correct optimization, only transmit those events for which you actually plan to train the advertising campaign.
FAQ
Related


Was this article helpful?