Skip to content
ChatterfyHelp Center
HomeGeneralCRMAI ManagerTrackerPlatformsFAQUpdate log
Tracker
Dashboards
Campaigns
Sources
Domains
Domains — custom domains
How to add a domain to Cloudflare
How to add a subdomain
How to Set Up SSL
How to add a domain in Chatterfy
Landings
Analytics
Cohorts
Leads
Integrations
  1. Tracker
  2. Domains
  3. How to add a domain to Cloudflare

How to add a domain to Cloudflare

This guide is the first step in connecting a custom domain to Tracker. After this stage, the domain will use Cloudflare DNS and have a CNAME record pointing to Chatterfy servers. Next, you need to con

Updated August 17, 20263 min
This guide is the first step in connecting a custom domain to Tracker. After this stage, the domain will use Cloudflare DNS and have a CNAME record pointing to Chatterfy servers. Next, you need to configure How to Set Up SSL and add the domain to Chatterfy (see How to add a domain in Chatterfy).
This guide is suitable only for a root domain (e.g., example.com). If you already have a root domain connected and need a subdomain (offer.example.com) — proceed to How to add a subdomain.
What to prepare
A domain purchased from any registrar (REG.RU, Namecheap, GoDaddy, and others). Access to the registrar's control panel (username/password). A Cloudflare account (if you don't have one, register at cloudflare.com, it's free). 15-30 minutes of time plus ~30 minutes for DNS propagation (this can happen in the background).


Video guide


Steps

  1. 1

    Add the domain to Cloudflare

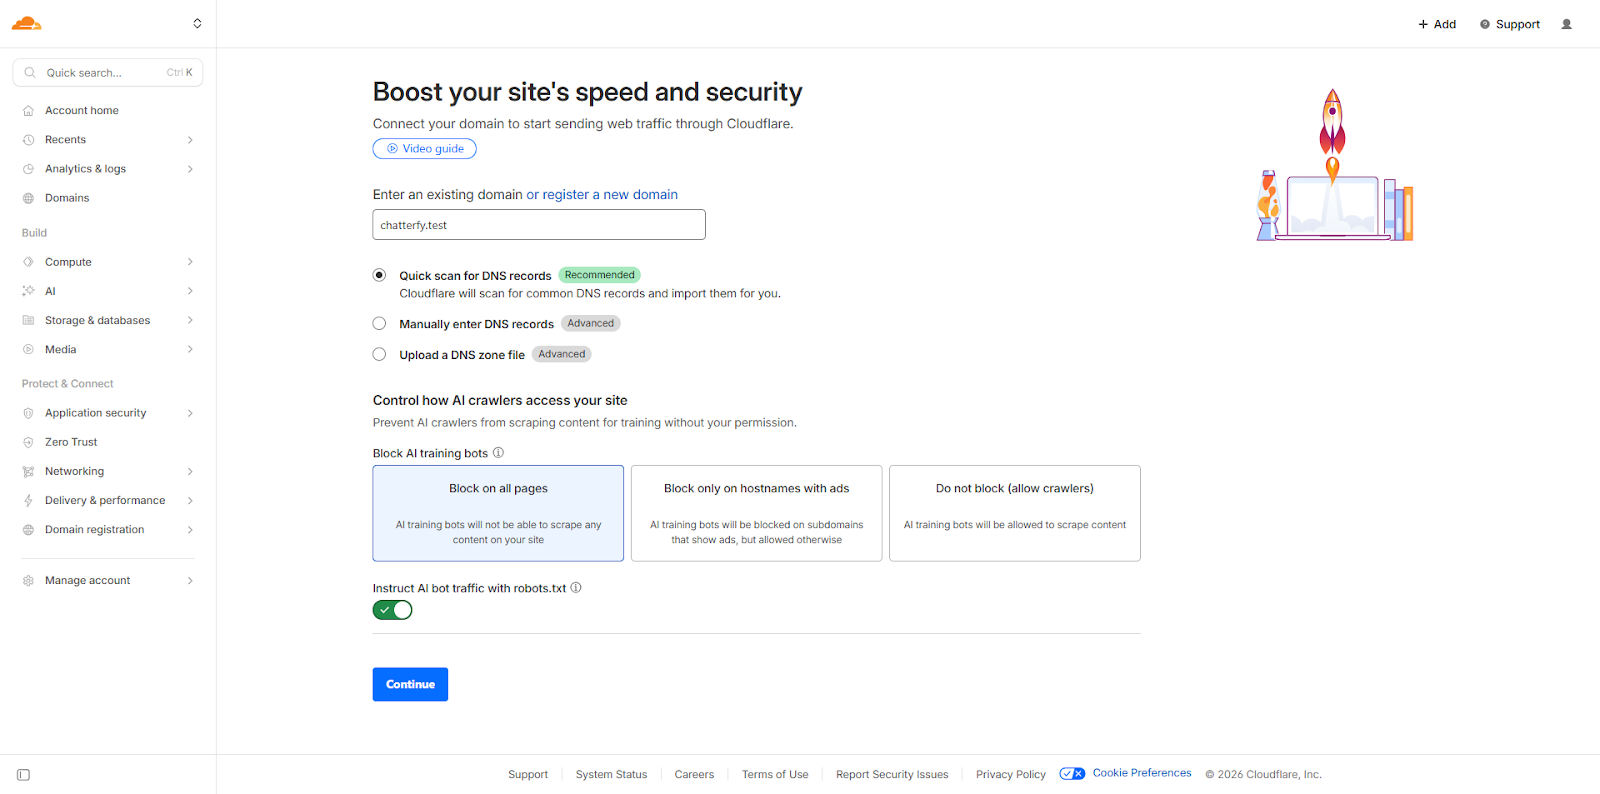
    Go to cloudflare.com → Add a Site → enter your domain (without http://, without www, just example.com) → Continue.
    Adding a domain to Cloudflare
    Add a Site in Cloudflare
    
  2. 2

    Select the Free plan

    Cloudflare will offer several plans. For Tracker, Free is sufficient — select it and click Continue.
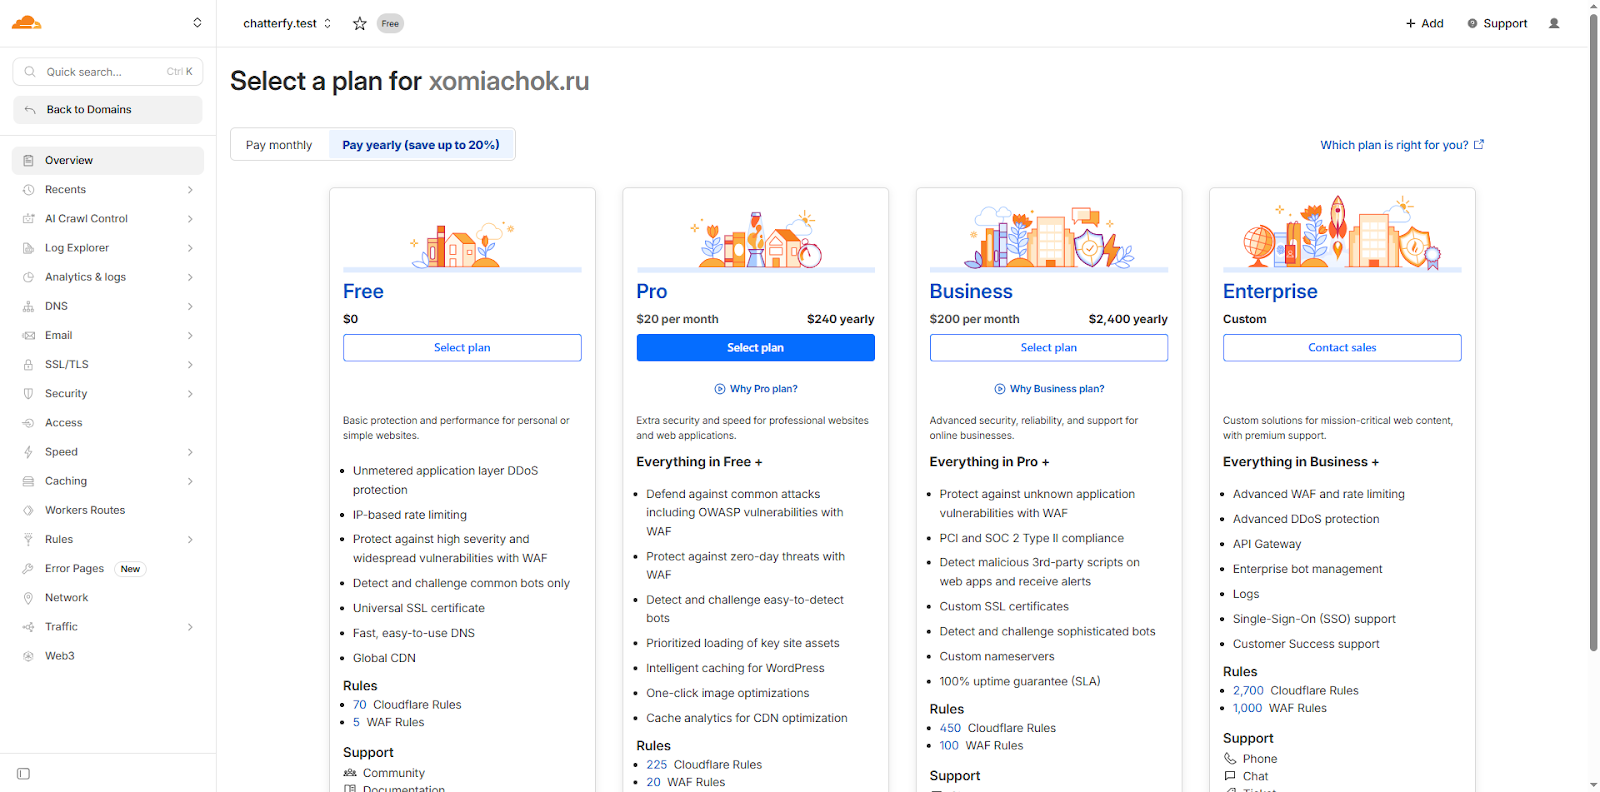
    Free plan
    Free plan
    
  3. 3

    Replace nameservers at your registrar

    Cloudflare will display two nameservers like alex.ns.cloudflare.com and eve.ns.cloudflare.com — you will have your own. Copy them.
    Log into your registrar's control panel → find the DNS / Nameservers / DNS Management section → delete the old NS and enter both Cloudflare NS.
    Section names vary by registrar: "DNS servers," "DNS Zone Management," "Name Servers," or "NS records." If you get confused, contact your registrar's technical support, they will help.
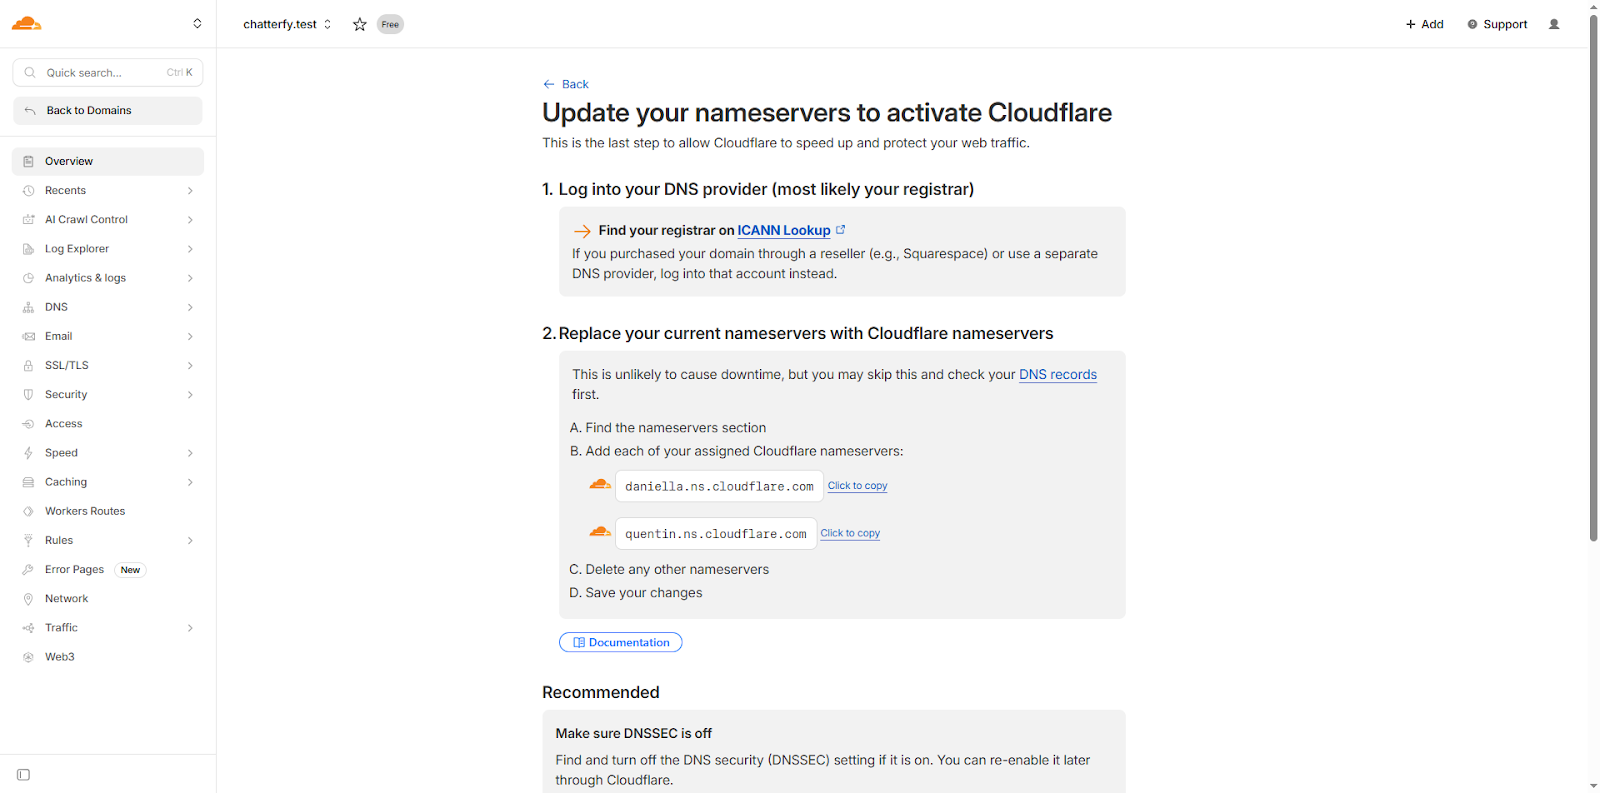
    Replacing nameservers
    Replacing nameservers at the registrar
    
  4. 4

    Wait for activation in Cloudflare

    After changing the NS, Cloudflare will detect the changes within 5-30 minutes and activate the domain. On the dashboard, the status will change from Pending to Active. You can continue in parallel — the next step does not require activation.
  5. 5

    Open DNS → Records

    In Cloudflare, go to your domain → DNS → Records. Add your DNS records here.
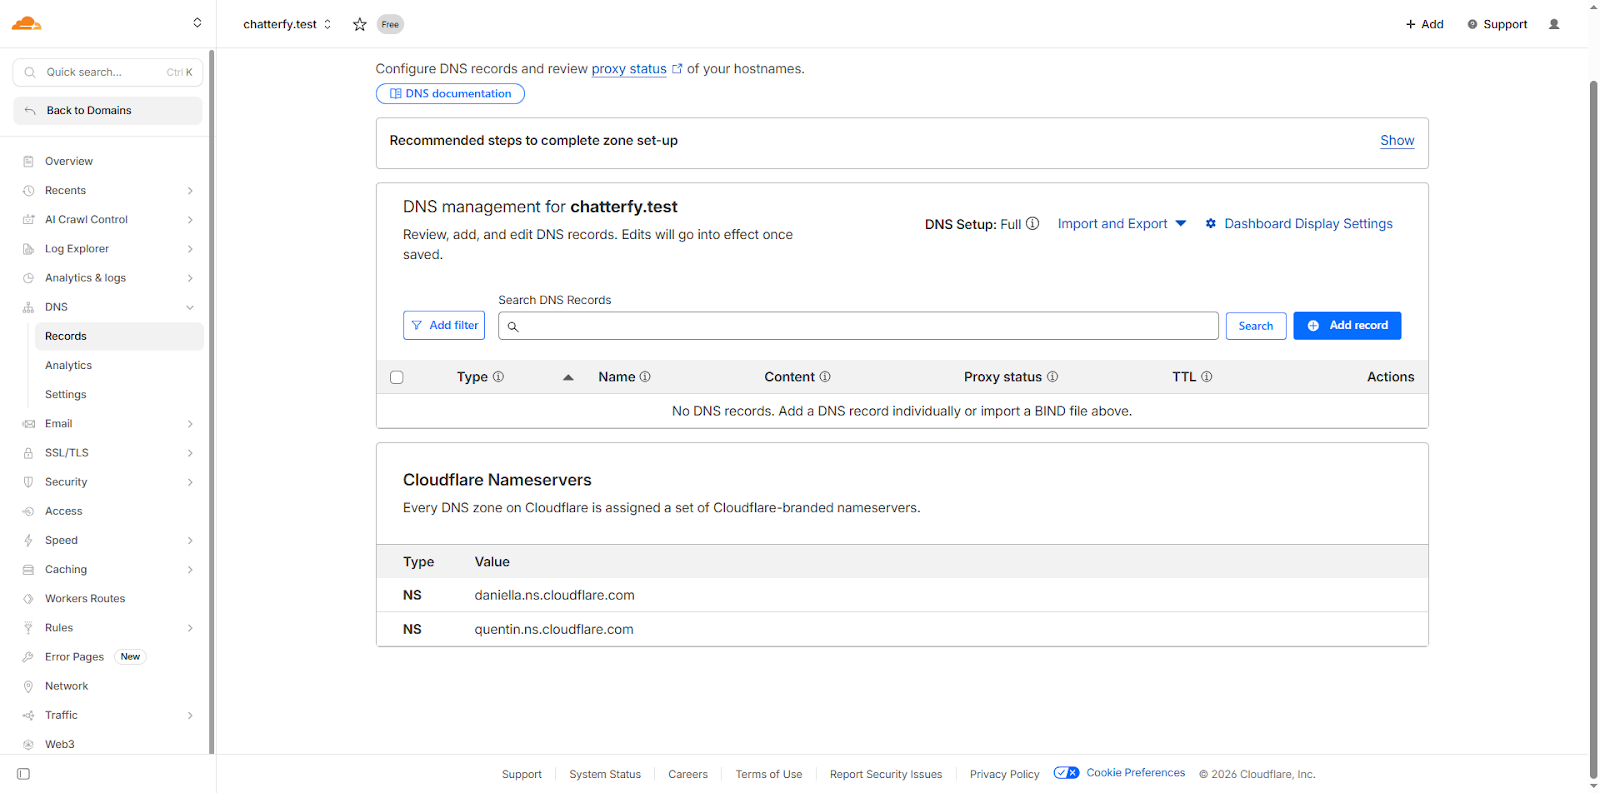
    DNS Records
    DNS → Records section
    
  6. 6

    Create a CNAME record

    Click Add record. Fill in the following:
    — Type = CNAME.
    — Name = @ (это означает «корневой домен», то есть example.com).
    — Target = tracker.chatterfy.ai.
    — Proxy status = Proxied (оранжевая иконка — даёт SSL и кэш Cloudflare).
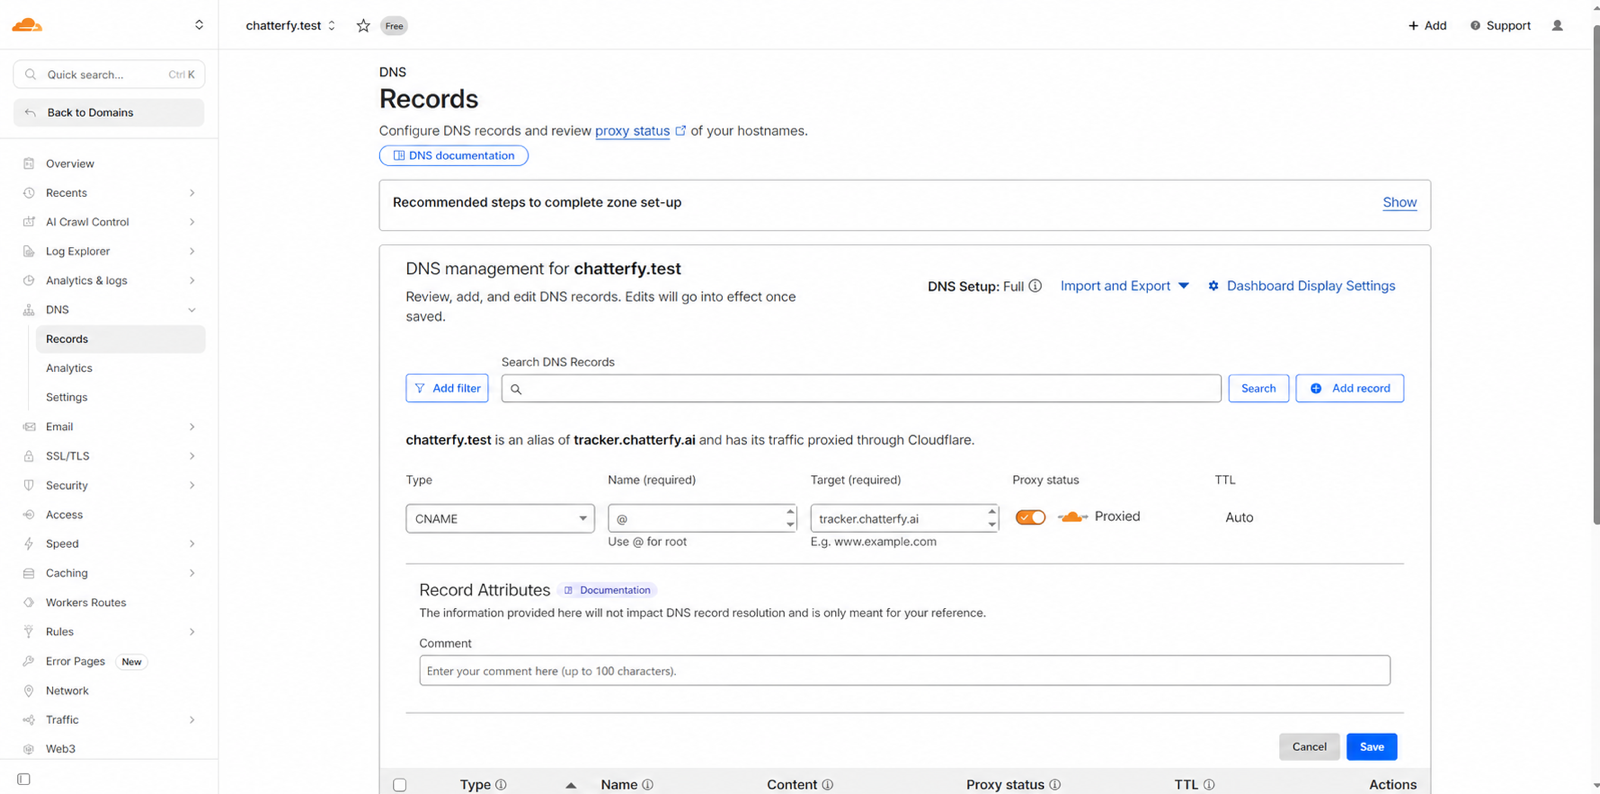
    CNAME record
    CNAME @ → tracker.chatterfy.ai
    
  7. 7

    Save

    Click the Save button. The record will appear in the list.
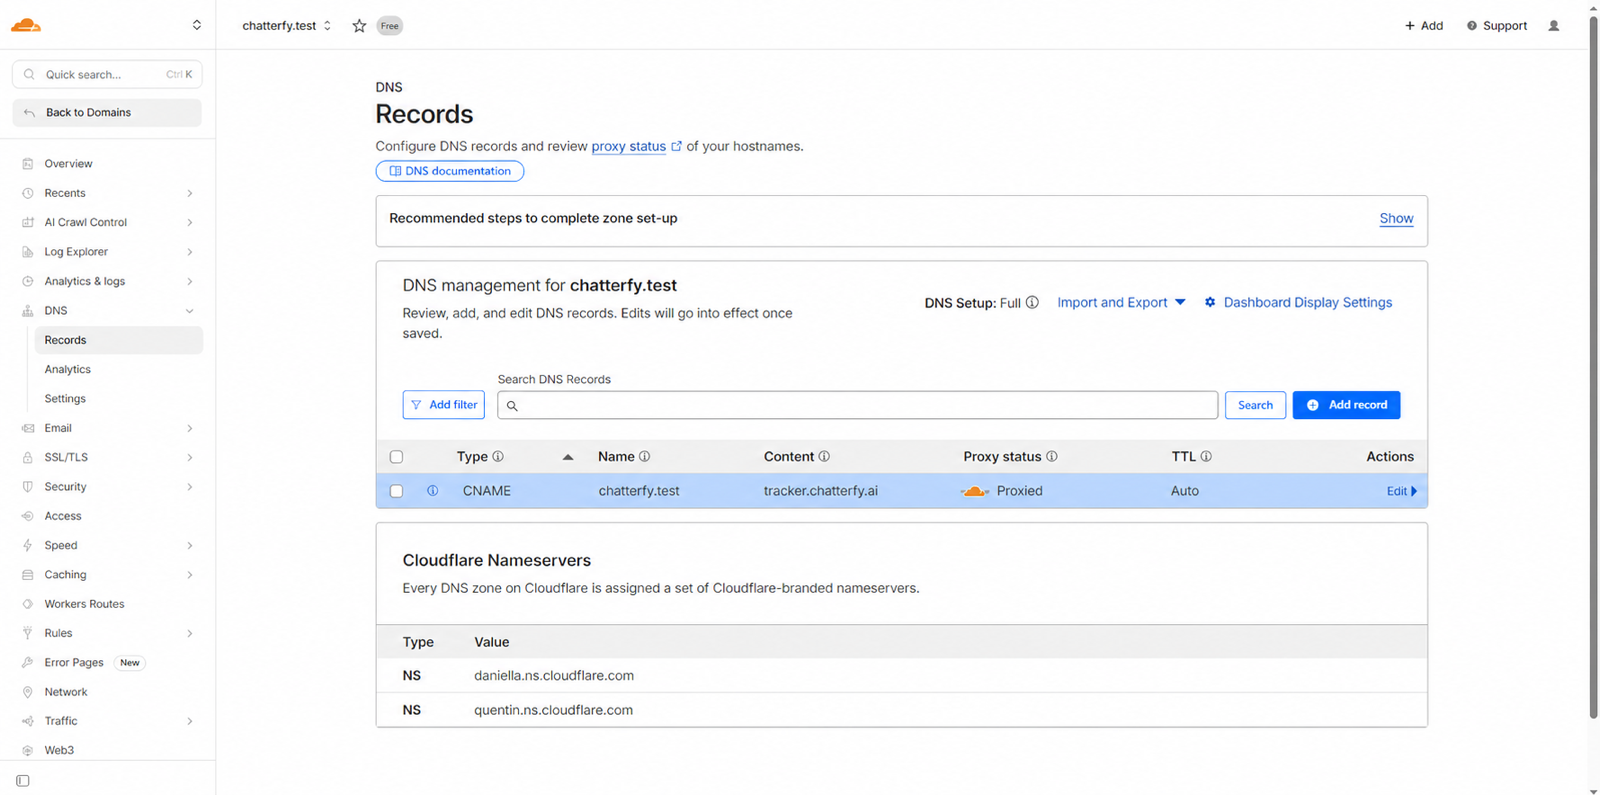
    Saved record
    Saved record
    
Что должно быть сделано
In Cloudflare, the domain status is Active. Nameservers at the registrar are updated to Cloudflare NS. In DNS Records, there is a record with Type=CNAME, Name=@, Target=tracker.chatterfy.ai, and Proxied enabled. Allow 15-30 minutes for manual setup + up to 30 minutes for DNS propagation.


What's next

After the Cloudflare configuration, you need to:
  • 1. Configure SSL — (Flexible mode in Cloudflare).
  • 2. Add the domain to Chatterfy —.
  • 3. If you need subdomains —.


If it does not work

Проверьте, что nameservers у регистратора реально заменены — иногда панель регистратора показывает «обновлено», а внутри ничего не сохранилось. Зайдите ещё раз и убедитесь. Также проверьте обновление nameservers через сторонний сервис — например, whois.com или intodns.com. Если NS старые — повторите смену. Активация после смены — 5-30 минут (иногда до 24 часов в худшем случае).

Possible reasons: the domain was registered recently (some registrars block NS changes for the first 60 days — Whois locking), or the domain is locked. Remove the lock via the control panel or contact your registrar's support team.

SSL is not configured yet — after Cloudflare setup, you need to go to How to Set Up SSL and enable Flexible mode. Without this, the SSL certificate will not be issued, and the domain will open with an error.

Проверьте, что Name = @ (корневой домен). Если в Name указано www или другой поддомен — Cloudflare примет, но это будет CNAME для поддомена, не для основного домена. Также проверьте, что Target правильный: tracker.chatterfy.ai (без https://, без слеша в конце).

When adding a domain, Cloudflare automatically imports existing DNS records. After activation, go to DNS → Records and delete the old A / AAAA / CNAME records related to the previous hosting. Leave only the CNAME @ → tracker.chatterfy.ai (plus MX records if email is used for this domain).

Не рекомендуется. CNAME @ → tracker.chatterfy.ai отбирает корневой домен под Tracker. Сайт компании — на отдельный поддомен (например, www.example.com или site.example.com) либо на отдельный домен. Оптимально: основной домен под бренд, поддомены offer.example.com, promo.example.com под Tracker.


Related

Domains — custom domains
Connecting custom domains and subdomains via Cloudflare for tracking links, landing pages, and event tracking in Tracker. Tracker → Domains is an infrastructure section used to connect domains for cam
How to Set Up SSL
SSL is an HTTPS certificate that encrypts the connection between the user's browser and the server. Without it, modern browsers show a scary “Not Secure” warning, and advertising platforms (Facebook,
How to add a domain in Chatterfy
This step is the final one. By this point, the domain must be connected in Cloudflare ( ), SSL configured ( ), and the domain must be accessible via https without errors. Now, you need to add it withi
How to add a subdomain
Поддомен — это отдельный адрес внутри уже подключённого основного домена ( offer.example.com , promo.example.com ). Технически — это просто новая DNS-запись в зоне Cloudflare. Не нужно менять nameserv

Was this article helpful?

BackDomains — custom domainsNextHow to add a subdomain

On this page

  • Video guide
  • Steps
  • What's next
  • If it does not work
  • Related